
Intro
Last Sunday, on a particularly lazy afternoon, I came across a Tweet that caught my attention. It was a demonstration of a local privilege escalation vulnerability that is possible when plugging in a Razer device to any Windows machine.
The TL;DR of this vulnerability is that Windows identifies the drivers and software required for a newly plugged in Razer mouse. Once it has done this, it kicks off a process to install the Razer Synapse software which is used for management and configuration of the Razer device. The installer that the user is prompted with allows you to interact with File Explorer and start PowerShell. Because Windows is attempting to install this software with system level privileges, the PowerShell session spawned also runs as the elevated NT Authority/System account. Using this privilege escalation vector, it is possible to gain system access to any Windows machine, even from low privileged guest accounts.

Whilst the vulnerability itself is very cool, some further discussion about the possibility of spoofing a USB device so that Windows identifies it as a Razer product is what really caught my eye. Intrigued, I decided to go about doing this using my old Android mobile to see if this was possible.

Along the way, I learned a lot about how USB devices are configured, how Windows interprets USB devices and how third-party drivers and packages are installed when they are first plugged in. I also learned how to spoof USB devices to control the behavior of Windows in a variety of different ways. Most importantly, I came to understand that this is not a vulnerability exclusive to Razer devices, and is rather a fundamental flaw in the way Windows handles all USB device installation.
The USB VendorID and ProductID
As it turns out, every single USB device is assigned a VendorID (VID) and ProductID (PID) value. This combination of values is embedded into the USB device along with text strings describing the functionality and communication protocols of the device. When a USB device is first plugged into a machine, the computer will read this information to identify what the device is, what its function is and what company is responsible for producing it.
For example, my keyboard has a VID of 046D, and a PID of C33C. By reading this information when the keyboard was plugged in, Windows is able to recognize the following information:
Vendor: Logitech
Product: G512 Carbon Tactile

Every VID value is unique, and any company can be assigned one by paying USD$5000 per year to register as an official USB vendor. By being formally assigned a VID, a manufacturer can embed their specific VID value into their devices to identify them to Windows (or other operating systems).
But if Windows only cares about the VID and PID combination, then in theory, we can spoof a USB device to match the VID and PID values of a legitimate Razer device. This should then trigger the same Razer installation behavior and reproduce the privilege escalation vulnerability.
USB Gadget Spoofing
During my research into possible spoofing methods, I came across the USB Gadget Tool app. This tool basically allows you to create different USB devices on your Android device. When plugging the Android phone into a computer, the computer will then identify the device as what has been configured on the app. At the time of writing, the USB Gadget Tool app supports the creation of devices that would communicate as a Keyboard & Mouse, FIDO CTAP, CCID or UVC Camera.

To install the USB Gadget Tool, the phone had to be rooted so that the app could perform actions with super user permissions on the underlying Android operating system. There are a number of different ways to do this, and because this was a process I was previously familiar with I had no real issues rooting my old Android phone to get this application working correctly.
However, although I was able to create a new device when using the app, there was no way to modify the VID and PID values within the app itself. Without being able to modify these attributes, the USB gadget would not be recognized as a Razer device by my Windows machine when the Android phone was plugged in. I needed a method to modify these VID and PID values to match an appropriate Razer combination.
When reading through the documentation of the app, I noticed that all the app does is interact with the Android’s ConfigFS system to create new USB gadgets. ConfigFS is a virtual filesystem that interacts directly with the Linux kernel. One of its core functions is to create new kernel objects with customizable configuration. Using ConfigFS, it is possible to create a new USB device with customized attributes that interact directly with the Linux kernel to appear as authentic USB devices.
Modifying ConfigFS is an action that could be performed manually on the Android phone, and the app was simply providing a GUI frontend to perform these actions. Surprisingly, there weren’t any easy-to-follow tutorials about interacting with ConfigFS that I could find, so I had to really dive into the information dump found in the official kernel.org documentation. Unsurprisingly, it was full of technical jargon and difficult to understand.

Once I wrapped my head around what I needed to do, I established a remote connection to my Android phone using the shell feature of the Android Debug Bridge protocol. Based on the official documentation, I knew that ConfigFS would be mounted in the /config directory. Sure enough, the USB device created by the USB Gadget Tool app was in this location, along with all the the various attribute files.
Straight away, I could see two files named idProduct and idVendor. Viewing the contents of these files returned two values that resembled a valid PID and VID.

I was interested to know what the default configuration of the device created by the USB Gadget Tool would be. By looking up the VID and PID combination in online databases, I was soon able to identify that the device was spoofing itself to be a Cherry Wireless Mouse and Keyboard. This means that when plugged into a Windows computer, Windows would identify it as a Cherry Wireless Mouse and Keyboard.

The next step was to identify the VID and PID combination of a Razer device that I wanted to spoof. Using the same databases, I settled on the following PID and VID values that would spoof my Android device into a Razer DeathAdder V2 gaming mouse:
VID: 0x1532 (Razer)
PID: 0x0084 (DeathAdder V2 Gaming Mouse)

Setting these values was very straightforward. Because I was connected to the Android phone as the root user, I simply overwrote the existing values using the echo command. Once I checked to make sure these had been updated accordingly, it was time to test!

Exploiting the Vulnerability
I was pretty excited to see Windows actually identified the Android device as a Razer DeathAdder mouse, and the Razer Synapse software start up its installation process. From there, all I had to do was recreate the vulnerability and my proof of concept was complete.
Exploiting this privilege escalation vulnerability is actually very straightforward. Once the Synapse software starts to load, click “Install location C:\Program Files (x86)\Razer” to open up a File Explorer session.

Within the File Explorer session hold Shift + Right Click, then select “Open PowerShell window here” to open a new PowerShell window.

The resulting PowerShell command prompt runs with system privileges! With only a few clicks, you can go from low privileged user to Nt Authority/System on any Windows machine.

I also filmed a quick video of the exploit in action to display how it work together with the Android phone (or view it directly on Streamable).
Other USB Products are Available…
Understandably, Razer received the majority of attention on Twitter when it came to this privilege escalation vulnerability. But this is not an issue exclusive to just Razer products. Any executable that allows user interaction that is started by Windows during installation could be a legitimate privilege escalation vector vulnerable to this same type of exploit.
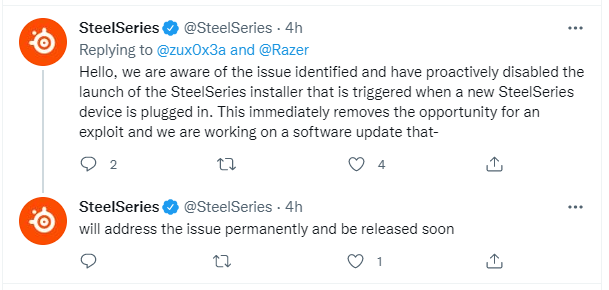
To highlight this, a couple of days after the first Razer tweet, there was a follow up demonstrating a similar vector using SteelSeries peripherals.

To their credit, SteelSeries were very quick to address this directly and had an update in place that prevents Windows from starting to automatically install their software. When I tried to recreate this with the USB Gadget Tool, I was able to confirm that the SteelSeries software did not begin automatic installation of it’s own management software.
Given the simplicity of this privilege escalation vector and the wide spread use of USB devices, it is almost certain that further examples exist for use in privilege escalation. Even when confined to gaming peripherals, there are so many different vendors that perform similar functions, that it’s highly likely an alternative to Razer or SteelSeries will behave in the same way.
Then, when you consider broadening the scope to any type of USB device, there is a near endless supply of products that could be used to escalate privileges. Using this method of modifying the VID and PID values of an Android device, it would be possible to test a range of different VID and PID combinations to simulate USB devices without actually owning any of the hardware personally.
Further Technical Breakdown
When a USB device is first plugged in, Windows uses built in technology known as Plug and Play (PnP) to examine the information embedded in the device. This technology enables the computer system to identify and adapt to new hardware with minimal user input required. Depending on the type of device, this automated setup process could install, load or update drivers, allocate hardware resources, and install new software.
To do this, Windows makes use of INF files, or Setup Information Files. INF files are plain-text configuration files that contain information on what drivers or software packages need to be installed in order for the USB device to function properly.
In this example, when plugging in a new Razer device, Windows Plug and Play will read the VID and PID values to identify it as being a Razer product. Based on these values, the relevant INF file is loaded and the full driver and software are installed if they are not already present on the machine.
The events in the Device Manager show the Plug and Play protocol identifying the VID and PID values, then assessing that further installation is required before the Razer DeathAdder mouse can be fully used.

In the Properties of the DeathAdder mouse, the third-party INF file associated was titled oem56.inf in my machine. Each 3rd party driver installed is represented as oemXX.inf, and is assigned when Windows Update installs the 3rd party INF files from the Microsoft repository.

To view a list of all the 3rd party drivers that are installed on your machine, the command dism /Online /get-drivers /format:table > C:\temp\drivers.txt can be run from an Administrative command prompt. This writes the information to a drivers.txt file in your machines temp directory.

Viewing this information shows each of the oemxx.inf files imported, along with the original INF file installed during the setup process. In this case, oem56.inf used for the installation of the spoofed Razer DeathAdder mouse corresponded to the rz0084dev.inf file imported by Windows. It’s worth noting that the naming convention of this INF file matched the PID of the DeathAdder mouse, which was 0084.


Once the name of the name of the rz0084dev.inf INF file was identified, it could be viewed in the location where INF files are stored locally on my machine. As discussed above, this INF file contains all the setup information for the Razer DeathAdder mouse, which Windows used to install new drivers and software. Towards the bottom of the rz0084dev.inf file was a reference to the RazerS3Coinstaller.dll and RzS3WizardPkgS3.exe files. As a result of the installation process started by Windows, these files were downloaded to the same directory location as the INF file and run.

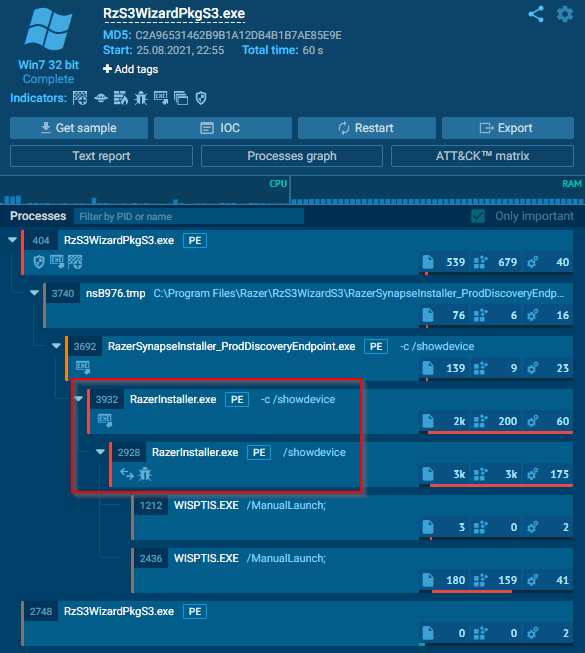
Analyzing the RzS3WizardPkgS3.exe file showed that this file was responsible for starting the RazerInstaller.exe process which launches the Razer Synapse installer. Viewing the processes running on my Windows machine during installation also confirmed this activity. The first process initiated was the RzS3WizardPkgS3.exe, which was responsible for then spawning RazerInstaller.exe.
Critically, all these processes run as the “Nt Authority/System” user, which is why PowerShell runs with system privileges when launched from the elevated File Explorer session. Razer Synapse installer simply inherits the permissions of the processes that launches it.

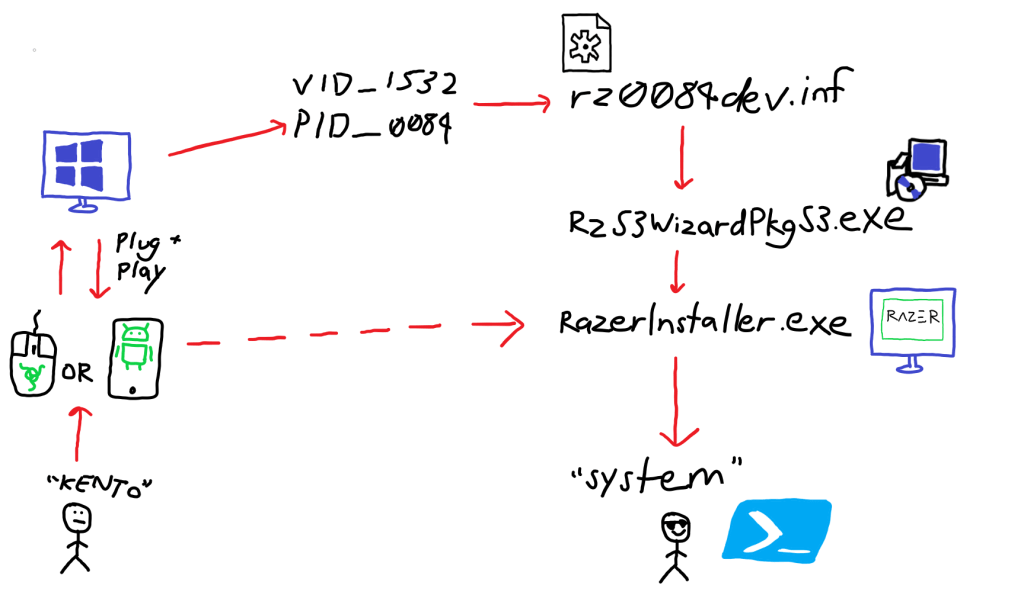
The complete steps that allow for a low leveled user who plugs in a Razer device to elevate themselves to system privileges can be illustrated as below. Although the only thing the user sees when plugging in a Razer device is the prompt for Razer Synapse installation, Windows has already read the embedded USB device information, identified the relevant configuration file, and installed new drivers and packages before the Razer Installer has even started.
So Whose Fault is it Anyway?
There was some level of debate on whether or not this is an issue with Razer or with Microsoft. Although the Razer installation software should not allow for PowerShell to be started via the File Explorer, ultimately this is an issue with the way Windows handles USB device installations. Even if Razer were to modify their installer to prevent this specific example, other installers have already proven to be similarly vulnerable. In order for this to be completely remediated, Windows would need to fundamentally change how external USB devices are installed.
The Windows Hardware Compatibility Program (WHCP) is the certification process Microsoft uses to sign drivers and packages from third party vendors for native Windows compatibility. This certification process is what enables Plug and Play to seamlessly install the required components for a device to function. Razer have included the RzS3WizardPkgS3.exe package as specified in the rz0084dev.inf setup file, which was subsequently reviewed and approved by Microsoft. Because this RzS3WizardPkgS3.exe is officially signed by Microsoft, Windows is able to run it with system privileges and automatically complete the Razer setup (including the prompt for the installation of the Razer Synapse software).

During the WHCP certification process, Microsoft need to thoroughly investigate what the drivers are doing and installing on Windows machines before formal approval and certificate signing. Some options to prevent this type of vulnerability being introduced could be to include preventing interactive executables from starting via the Windows Update service, or requiring these services to prompt the user for admin rights rather than blindly running as system by default.
Ultimately, Microsoft will need to perform thorough vetting on all third party drivers that it signs, so that this type of privilege escalation vector is not introduced in the future. In a worst case scenario, it could even be possible for Microsoft to sign drivers that not only provide a privilege escalation path, but are outright malicious. As a matter of fact, this has already has literally been done before…
Some Quick Thoughts on Defence
An impressive aspect of this vulnerability is that it is very hard EDR or Antivirus solutions to detect. Because it makes use of signed and trusted Microsoft processes required for device installation, there is no indicator that malicious activity is occurring on the machines. This pretty much rules out any endpoint solutions that exist on the current market, unless very specific detection rules are implemented (at least as far as I’m aware). To make matters even worse, this vulnerability affects all versions of Windows.
The only viable method that I can think of to prevent this type of attack is through robust endpoint hardening. The most watertight method to prevent this type of attack is to reduce the attack surface entirely by disabling external USB devices from being plugged in to Windows machines. This can be done using Group Policy, but this is impractical advice that will be nearly impossible to fully implement in the majority of organizations.
A less disruptive approach could be to tune Group Policy so that only approved VID and PID values can be installed on machines. This way, trusted devices or manufacturers can be allowed, and unapproved devices (such as Razer products) will be prevented from being installed by Windows. However, this method would require a lot of work to tune and implement correctly, and an argument could be made that Razer peripherals (or similar equipment) should be allowed for use regardless.
Other than those two options, there aren’t a lot of good mitigations that can be implemented currently. Aside from hoping that Microsoft addresses this themselves, it’s likely that this issue will persist in some form for the foreseeable future.
If you’re concerned about this Razer privilege escalation specifically, blocking access to the discovery.razerapi.com and manifest.razerapi.com domains will prevent the installer from being loaded. Alternatively, consider adding RazerInstaller.exe to a deny list if application controls are configured for endpoint devices.
Future Research?
The most obvious area for further research is to identify other products that could be used as an alternative to Razer devices. As discussed in this post, this is not an issue that exists solely in Razer products. Given the relative ease with which USB devices with customized VID and PID values can be created, it would not be a hard task to iterate through different products and identify ways to leverage the automatic software install process to gain system privileges.
Beyond just identifying further privilege escalation vectors, future efforts could also be directed at automating the escalation process and subsequently performing malicious actions or establishing persistence on the host.
An example use case could be configuring a script to automatically elevate to the system level privileges, disabling the local antivirus and installing command and control malware on the machine. This privileged access could then be used to maintain persistence and begin lateral movement throughout a network.
The original poster on Twitter also offered his own thoughts on how persistence could be obtained by installing the process in a user controlled path, which would be require another blog post entirely:

Conclusion
I really enjoyed digging into this vulnerability to understand how USB devices are installed by Windows, and how to spoof these devices to control the behavior of Windows machines. It’s clear that external USB devices still remain a real threat to many organizations and should absolutely be treated as a source of untrusted input.
For this vulnerability in particular, it’s pretty easy to see how this privilege escalation vector would be useful to attackers or penetration testers. A couple of my friends have already joked about bringing a Razer mouse to their next on site pentest! Despite their jokes, I genuinely would not be surprised if they did, so make sure to keep a look out for anyone plugging in a Razer product around the office. Most Razer devices would look at least somewhat out of place in an office setting, but Android phones on the other hand…
I hope you found this post informative and useful, I’m aiming to make more regular posts of a similar nature in the near future.
Cheers,
Kento.

One thought on “Spoofing an Android Phone to Exploit the Razer Local Privilege Escalation Vulnerability”